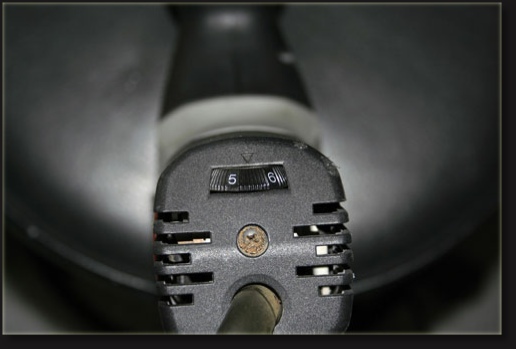
Being reasonably soft, aluminium can be cut easily with an ordinary jig saw fitted with the correct blade. When buying a jig saw it’s good to pick it up and get a good idea of how comfortable it is to hold, how heavy it is, does it have the shape you are after. The saw pictured here is the barrel type. It has a long body with a high bulge at the front, it can be gripped any-where along the body or at the front. Other saws come with a handle as part of the design and I’ve seen at least one where it can be converted to be either type. Other features that are handy are a speed control, seen here on the lower left, and a pendulum control seen below. The pendulum action makes the blade go ‘back and forth’ as well as ‘up and down’, this has the effect of biting into the material and speeding up a cut. This feature is handy for cutting thick plate. Another thing you will need is a pair of safety glasses, these are cheap and available from the hardware store. You MUST wear them every time the saw is used, bits of material are always flying, at great speed, away from the blade while cutting and it often heads for your eyes.
ALWAYS WEAR SAFETY GLASSES WHEN USING A JIG SAW

Various blades are available for cutting different materials. Make sure you get the correct blade for the job. The blades pictured below are for cutting aluminium, they are available in either a wide or thin profile. The thin profile are good for cutting tight bends and turning quickly in the material, though they are a little less accurate for cutting straight lines. Get both types if you can afford it, if not just get the thin type as these are more versatile.

Marking up the material for cutting is very important. I generally mark up first with pencil and when I’m happy that everything is OK, I go over the cut lines with a black pen. Just make sure you can easily see the guide line, in the past I’ve made a mess by not being able to clearly make out the cutting lines. The next thing is to make all the areas that need to be cut out accessible to the saw. In the example here, some small areas need to be cut out in the body of the part, so holes need to be drilled for the blade to fit into so that the cuts can be made.

The material in this example is 4 mm sheet, and is large enough to hold securely with my left hand while cutting. This isn’t always the case and sometimes the part will need to be clamped down. ALWAYS be aware of the relationship between the work piece and surface it’s resting on. It’s very likely that you will encounter all sorts of very nasty situations if you don’t pay attention to ‘where everything is’. I’ve broken blades, wrecked the part I was working on, and damaged the surface I was working on as well as wiped out a good saw. I’m very fortunate to have suffered no injuries, but if you think about it for a moment it’s clear how serious this is. Also, how you stand while you are cutting is very important. Stand so that you are not leaning or poorly balanced, spread your feet apart and make sure you are comfortable. Try to have the cut line as close to the support surface edge as possible, where you are cutting inside corners or other tight shapes, drill a pilot hole in the middle of a line and make two cuts into the corner, as in the example above. Now any jig saw is just not that accurate, so always cut away from the guide line. How far away you cut from the guide line is up to you, just remember that the further away the cut, the more work later filing down. Experience will show you how far away you need to cut so that all irregularities can be cleaned up later.


For cutting in thicker material you may need to use lubricant. Any tapping, drilling or cutting fluid will do. In all honesty though, I only ever used this once, and only for a short time. The blade just doesn’t get very hot when cutting and I did not notice any increase in efficiency or accuracy. I did notice cutting fluid flying everywhere making an incredible mess with bits of material sticking to everything, the masking tape lifting, and guide line disappearing in all the sludge. I don’t use any lube when cutting. The job in the example is a part from 8 mm plate and the lube was used to cut about half of the edge you see below the bottle on the left. The rest was cut dry, without lube.


For cutting holes into sheet or plate, bi-metal hole saws can be very handy. These are available in many sizes up to 150 mm and beyond, of course once you start getting to the larger ones, the price also rises dramatically. Any larger holes (like 120 mm fan holes) I just cut with the jig saw because, to me, the cost of a hole saw for the job is just not worth it and large holes are easy to cut accurately by hand. But you can get good kits like the one pictured here very cheaply. I am lucky enough to have a good quality drill press but these smaller hole saws can also be used in a hand drill with care. I do use lubrication with these because they can get very hot. Again I cannot stress how important it is to wear proper eye protection when using any kind of machinery.


Once the holes are cut, they can be very rough, so they need to be cleaned up. An easy way, is to use some of these abrasive cylinders in a hand drill. These are also quite cheap and come in a box with the rubber holders of varying size and several abrasive cylinders. Just remember to keep the drill moving in a uniform circular way or the hole can be ruined.


You can cut almost any shape that comes to mind it’s just a matter of planning how it will be done, usually in the safest easiest possible way. You can be quite rough in the cutting out stage remembering what is possible later with the filing. As the material gets thicker the cutting takes longer. Don’t be discouraged by this though, a good quality blade can cut for a long long time and the cut will get done. Remember to keep in mind that a jig saw blade will not just cut any shape, and that drilling pilot holes in strategic places facilitates the easy cutting of the shape you are after.


Cutting circular parts is best done with the slim profile blade. These allow turning during the cut to be carried out much more easily. Do not force the blade! Apply just enough pressure to keep the blade moving forward.

The thickest material I’ve cut to date is this 12 mm bar. Although this was tough going, it may have been because of the small size of the piece that was being cut. However, the very rough condition of the cut tells me that this is approaching the limits of what can be cut with my jig saw at least.
Edit: In the time since this guide was written, I’ve successfully used my jig saw to cut shapes from 25mm and even 40mm plate.


In the pictures below, notice that to give the jig saw’s base somewhere to rest, a piece of the same material was clamped next to the work piece. You will most likely have to invent all sorts of jigs and props to cut various odd pieces.


Sometimes a jig saw is not the best way to cut something at all. Here, to make a long straight cut in some bar, first some holes are drilled and then the holes joined together. When the resulting void is large enough, the hack saw blade can be inserted and the cut made. This saw has an angled rest for the blade as well as the usual rest, very handy for long cuts.


Be aware that the views and opinions published here belong to the author. Guides included on this site are the way I do things and are not an exhaustive or thorough examination of the subject under discussion. There may be different and better ways to achieve a desired result, the best advice I can give is ‘look around’, there is always a better way to do anything.
Guide Courtesy of Attila Lukacs